Marzban to PasarGuard
This guide is for Marzban versions beta-3 and below.
This guide will help you migrate your data, settings, and user accounts from Marzban to PasarGuard without losing anything.
Two migration methods are explained. You can choose whichever you are more comfortable with.
Keeps all the existing settings and files. Does not require a new server. But slightly more complex and involves more commands.
Easier and faster, with fewer commands. But requires a new server and some settings need to be configured manually after migration.
Prerequisites
⚠️ Important: Always have a complete backup of your data before starting the migration process.
- Make sure you have root access to your server.
- Have a backup of your current Marzban installation.
- Check that Docker and Docker Compose are installed.
Migration Steps: Current Installation
1. Stop Marzban Services
First, stop all running Marzban containers:
Stop Service Commands
cd /opt/marzban
docker compose down
2. Rename Main Directory
Delete the PasarGuard directories, if they already exist:
Directories Delete Command
rm -r /opt/pasarguard /var/lib/pasarguard /var/lib/mysql/pasarguardChange the main Marzban directory name to PasarGuard:
Directory Rename Command
sudo mv /opt/marzban /opt/pasarguard3. Rename Data Directory
Change the data directory name as well:
Data Directory Rename Command
sudo mv /var/lib/marzban /var/lib/pasarguard4. Rename MySQL Directory (if using)
If you're using MySQL or MariaDB and have a dedicated directory for Marzban database:
MySQL Directory Rename Command
sudo mv /var/lib/mysql/marzban /var/lib/mysql/pasarguardIf you encounter a "No such file or directory" error, it may be because the MySQL directory is different. Use this command instead:
mkdir -p /var/lib/mysql/pasarguard
mv /var/lib/pasarguard/mysql/* /var/lib/mysql/pasarguard
rm -r /var/lib/pasarguard/mysql
5. Update Environment Variables
Go to the new PasarGuard directory and update the environment file:
cd /opt/pasarguardUpdate all paths referenced in the .env file with a simple command:
sudo sed -i 's|/var/lib/marzban|/var/lib/pasarguard|g' .envIf you're using an older version (0.8.4 or below), you also need to change the SQL driver:
Open the .env file:
nano .envSQLite Driver Update
❌ Old
SQLALCHEMY_DATABASE_URL = "sqlite:////var/lib/marzban/db.sqlite3"✅ New
SQLALCHEMY_DATABASE_URL = "sqlite+aiosqlite:////var/lib/pasarguard/db.sqlite3"MySQL Driver Update
For MariaDB, follow the same procedure as for MySQL.
⚠️ Warning: In this example,
MYSQL_ROOT_PASSWORDshould be replaced with its value from your.envfile.
❌ Old
SQLALCHEMY_DATABASE_URL = "mysql+pymysql://root:MYSQL_ROOT_PASSWORD@127.0.0.1/marzban"✅ New
SQLALCHEMY_DATABASE_URL = "mysql+asyncmy://root:MYSQL_ROOT_PASSWORD@127.0.0.1/pasarguard"Other Changes
If you are using V2RAY_SUBSCRIPTION_TEMPLATE in your .env file or have a TLS Inbound configured, you should update them; Otherwise, you can skip this step.
Rename v2ray to xray Directory Command
Change v2ray directory to xray with this command:
mv /var/lib/pasarguard/templates/v2ray /var/lib/pasarguard/templates/xrayUpdate xray-config Certificate Directories
Update the certificate directories from marzban to pasarguard in your xray_config.json file:
nano /var/lib/pasarguard/xray_config.jsonAfter changes, your .env file and xray_config.json should look something like this:
Update Xray Subscription Template in .env
❌ Old
V2RAY_SUBSCRIPTION_TEMPLATE = "v2ray/default.json"✅ New
XRAY_SUBSCRIPTION_TEMPLATE = "xray/default.json"Update Certificate Directories in xray_config.json
❌ Old
      "certificates": [
        {
          "certificateFile": "/var/lib/marzban/certs/example.com/fullchain.pem",
          "keyFile": "/var/lib/marzban/certs/example.com/key.pem"
        }
      ],
✅ New
      "certificates": [
        {
          "certificateFile": "/var/lib/pasarguard/certs/example.com/fullchain.pem",
          "keyFile": "/var/lib/pasarguard/certs/example.com/key.pem"
        }
      ],
6. Update Docker Compose File
Update the docker-compose.yml file to reflect the new paths. You need to manually edit this file:
sudo nano docker-compose.ymlDocker Compose Changes
Here's a comparison showing the necessary changes for each database:
Key Changes Summary:
| Section | Before | After |
|---|---|---|
| Service Name | marzban | pasarguard |
| Docker Image | gozargah/marzban:latest | pasarguard/panel:latest |
| App Volume | /var/lib/marzban:/var/lib/marzban | /var/lib/pasarguard:/var/lib/pasarguard |
| MySQL Database | marzban | pasarguard |
| MySQL Volume | /var/lib/mysql/marzban:/var/lib/mysql | /var/lib/mysql/pasarguard:/var/lib/mysql |
7. Change Marzban MySQL Database to PasarGuard (if using)
If you're using SQLite database, skip this step.
If you're using MySQL or MariaDB database, export the Marzban database using the following commands so that it can later be imported as the PasarGuard database.
⚠️ Attention: All the following database migration commands should be executed while you are in the
/opt/pasarguard/directory.
Start MySQL or MariaDB
First, start the MySQL or MariaDB service, depending on which one you are using.
cd /opt/pasarguard && docker compose up -d mysqlcd /opt/pasarguard && docker compose up -d mariadbExport Database
Export the Marzban database. You will be prompted to enter the database password — use the value of MYSQL_ROOT_PASSWORD from your .env file.
docker compose exec mysql mysqldump -u root -p -h 127.0.0.1 --databases marzban > "/opt/pasarguard/marzban.sql"docker compose exec mariadb mariadb-dump -u root -p -h 127.0.0.1 --databases marzban > "/opt/pasarguard/marzban.sql"If you encounter an "Access Denied" error, try using marzban user with MYSQL_PASSWORD value from your .env file:
docker compose exec mysql mysqldump -u marzban -p -h 127.0.0.1 --databases marzban > "/opt/pasarguard/marzban.sql"docker compose exec mariadb mariadb-dump -u marzban -p -h 127.0.0.1 --databases marzban > "/opt/pasarguard/marzban.sql"Edit Database Information
This step is crucial to ensure that the pasarguard database is created in MySQL. The following command will replace "marzban" with "pasarguard" in two important lines:
sed -i '/^CREATE DATABASE/s/marzban/pasarguard/;/^USE/s/marzban/pasarguard/' /opt/pasarguard/marzban.sqlImport PasarGuard Database
To import the new database, replace MYSQL_ROOT_PASSWORD with its value from your .env file and execute this command:
docker compose exec -T mysql mysql -u root -p"MYSQL_ROOT_PASSWORD" -h 127.0.0.1 < "/opt/pasarguard/marzban.sql"docker compose exec -T mariadb mariadb -u root -p"MYSQL_ROOT_PASSWORD" -h 127.0.0.1 < "/opt/pasarguard/marzban.sql"This process may take some time to finish.
If you don’t see any output, that’s a good sign.
To verify that the database import was successful, list the MySQL databases — you should see pasarguard among them.
Replace MYSQL_ROOT_PASSWORD with its value from your .env file and run the command.
docker compose exec mysql mysql -u root -p"MYSQL_ROOT_PASSWORD" -e "SHOW DATABASES;"docker compose exec mariadb mariadb -u root -p"MYSQL_ROOT_PASSWORD" -e "SHOW DATABASES;"If you encounter any errors while running the database import command, it means something went wrong — check your database credentials and try again.
Drop Marzban Database
Since we don't need the Marzban database anymore, we can drop it.
You will be prompted to enter the database password — use the value of MYSQL_ROOT_PASSWORD from your .env file.
⚠️ Caution: The following commands will delete the Marzban database. Make sure you have a complete backup of your data and are prepared to restore it if anything goes wrong.
rm /opt/pasarguard/marzban.sql
docker compose exec mysql mysql -u root -p -e "DROP DATABASE marzban;"
rm /opt/pasarguard/marzban.sql
docker compose exec mariadb mariadb -u root -p -e "DROP DATABASE marzban;"8. PasarGuard Script
Install the PasarGuard management script for easier management:
Script Installation Command
curl -sL https://github.com/PasarGuard/scripts/raw/main/pasarguard.sh | sudo bash -s -- @ install-scriptThis script provides useful commands for managing your PasarGuard installation.
9. Start PasarGuard
Now start PasarGuard with the new configuration:
Startup Command
pasarguard restart10. Verify Migration
Check that all services are running properly:
Verification Commands
pasarguard statusOpen your panel URL to make sure everything is working correctly.
Migration Steps: New Installation
💬 Note:
In this migration method, your previous settings in the .env file will not be transferred to PasarGuard, and you’ll need to configure it manually.
You can review all configurable variables inside the .env file or refer to the Panel Configuration Documentation for details.
Some settings — such as the Telegram Bot, Subscription URL Prefix, and others — are now configured directly from the dashboard settings.
1. Install PasarGuard
First, install PasarGuard on your new server using the commands corresponding to your current database, as described in the Panel Installation Documentation. Make sure to review the instructions carefully.
2. SSL Certification
You need to enable SSL on PasarGuard to access the dashboard securely.
Upload your SSL certificate files to your server and place them in the /var/lib/pasarguard/certs/ directory.
If you don’t have an SSL certificate yet, you can obtain one — see the SSL Activation Document.
Once your SSL certificate is ready, enable it in the .env file using the UVICORN_SSL variables.
pasarguard edit-env3. Upload Your Database
Now, you need to upload the database to your server. The procedure varies depending on which database you are using.
Import SQLite Database
- Simply place the
db.sqlite3file from Marzban into the/var/lib/pasarguard/directory — that’s it.
Import MySQL or MariaDB Database
If you are using MySQL or MariaDB database, you will need to import the database using the phpMyAdmin app. Follow these steps carefully:
- Edit the database file:
You need to edit your MySQL or MariaDB database file.
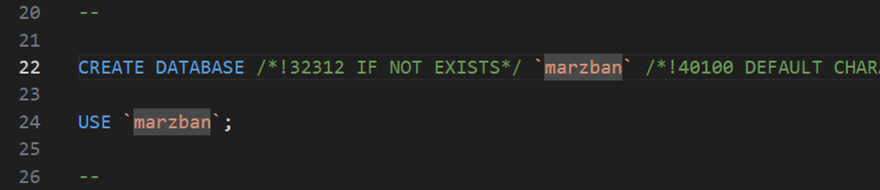
Open your marzban.sql file from your Marzban backup in a text editor.
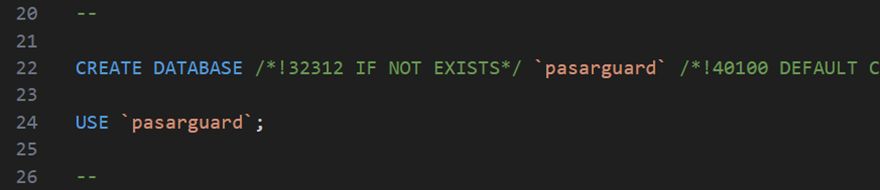
Replace marzban with pasarguard in these two lines as shown in the picture and save the file.
If you don't have these two lines in your file, proceed to next step.
❌ Before
✅ After
- Open phpMyAdmin:
You can access phpMyAdmin in your browser at: http://YOUR_SERVER_IP:8010.
Log in using the root user and MYSQL_ROOT_PASSWORD value from your .env file.
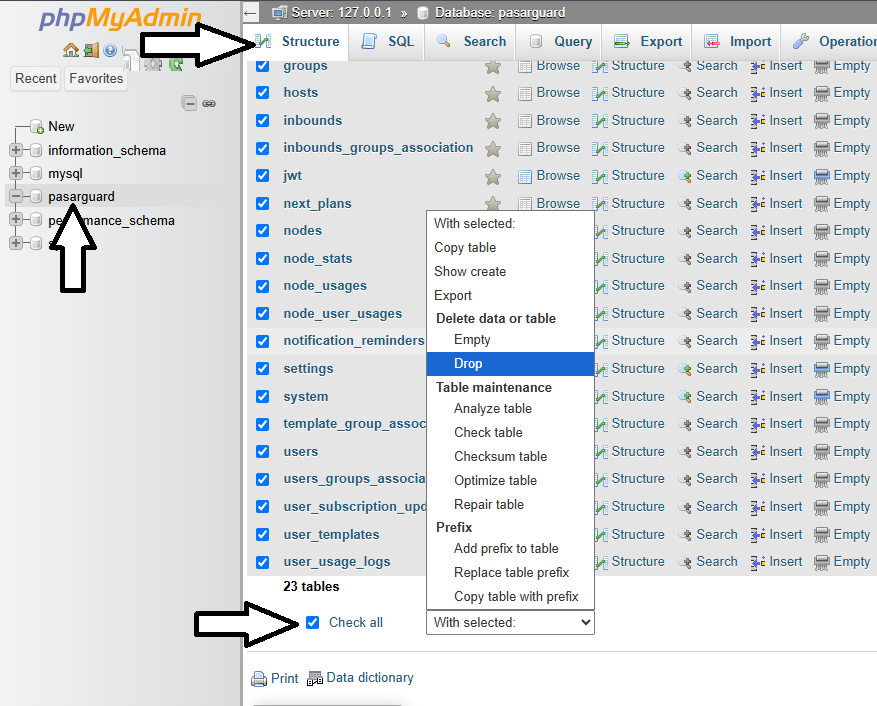
- Drop tables:
Drop the existing tables as shown in the picture:
- Import database:
Now, navigate to the "Import" tab in phpMyAdmin. Select your marzban.sql file in the "Choose File" section, then click the Import button.
4. Restart PasarGuard
Finally, restart PasarGuard:
pasarguard restartTroubleshooting
Common Issues
💡 Tip: Most issues can be resolved by checking file permissions and path configurations.
1. Permission Denied: Make sure you're running commands with appropriate permissions (sudo when needed).
2. Database Connection Issues: If you're using MySQL, check that database paths and login information are properly updated.
3. Port Conflicts: Make sure no other services are using the same ports.
4. Missing Environment Variables:
Double-check that all environment variables in the .env file are properly updated.
Rollback
⚠️ Emergency Rollback: If you encounter serious issues and need to revert to the previous version
# Stop PasarGuard
cd /opt/pasarguard
docker compose down

# Restore original directories
sudo mv /opt/pasarguard /opt/marzban
sudo mv /var/lib/pasarguard /var/lib/marzban
sudo mv /var/lib/mysql/pasarguard /var/lib/mysql/marzban  # if using

# Restore original docker-compose.yml and .env files from backup
# Then start Marzban
marzban up
Post-Migration
After successful migration:
- 📡 PasarGuard Nodes: Install and connect PasarGuard Nodes. PasarGuard itself doesn't run Xray-Core.
- 📊 Update Monitoring: If you have monitoring tools, connect them to the new paths.
- 💾 Update Backups: Make sure your backup scripts are updated to backup from the new directories.
- 🧪 Test All Features: Thoroughly test all panel features to ensure everything is working correctly.
Support
🔗 Links
- Discussion Group: Telegram
- Issues: If you encounter any problems during migration, create an issue.
📝 Note: This guide assumes a standard Marzban installation. Custom configurations may require additional steps.